Introduction:
In the ever-evolving landscape of app development, Progressive Web Apps (PWAs) have emerged as a game-changing technology, offering a bridge between the web and native applications. Their ability to provide a seamless and engaging user experience, along with the convenience of easy updates, has made PWAs a popular choice for businesses and developers alike. However, the journey from conceptualizing a PWA to successfully publishing it on both Google Play Store and the Apple App Store can be a daunting one. In this comprehensive guide, we will navigate the intricate process of publishing a PWA app, unveiling the step-by-step strategies, insights, and best practices that will empower you to conquer the challenges and triumph in the world of PWA app publishing. Whether you’re a seasoned developer seeking to enhance your skill set or a business owner looking to extend your digital reach, this guide will serve as your compass in the exhilarating journey of bringing your PWA to life on two of the largest app distribution platforms. Join us as we delve into the intricacies of PWA app publishing, unraveling the mysteries, and paving the way for your success on the global stage of digital app marketplaces.
Crafting Your PWA into Native: Building APK and iPA Files with PWABuilder.com
Welcome to the inaugural phase of our journey towards successfully publishing your Progressive Web App (PWA) on the Google Play Store and Apple App Store. As we embark on this transformative process, the first crucial step is to seamlessly transition your PWA into the realm of native applications. This pivotal step is made remarkably convenient with the assistance of a powerful tool – PWABuilder.com.
PWABuilder.com serves as your gateway to converting your PWA into tangible and versatile assets – the APK (Android Package) and IPA (iOS Application Archive) files. These files hold the key to bringing your PWA to life as a fully functional app on both Android and iOS platforms.
The intuitive interface of PWABuilder.com empowers you to effortlessly bridge the gap between web and native applications. With just a few clicks, your PWA’s features and functionalities are encapsulated within these files, primed to provide a seamless experience to users on their respective devices.
Step 1: Navigating PWABuilder.com: Transform Your PWA with Ease
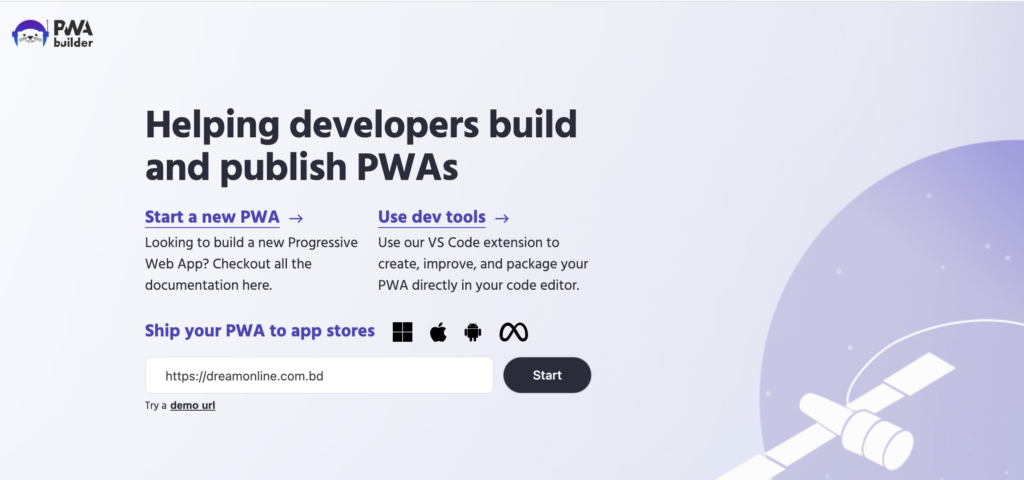
Navigate to PWABuilder.com.
Paste the URL of your website into the designated field.
With anticipation building, hit that “Start” button, igniting the analysis that will set your journey in motion.
As the gears start turning, PWABuilder.com meticulously scrutinizes your website, identifying any errors or warnings that might need your attention. These insights are pivotal in ensuring your PWA’s seamless functionality as a native app.
But remember, dear traveler, the path to successful app publishing demands diligence. It’s crucial to resolve all identified errors before proceeding to the next steps. This meticulous attention to detail will lay a solid foundation for your PWA’s triumphant transformation.
Step 2: Seal the Deal: Packaging Your PWA App for Stores
To package your PWA app and prepare it for its grand debut, follow these guided steps:
On the PWABuilder.com dashboard, locate and click on the “Package for Stores” option. This portal holds the key to transforming your PWA into tangible packages fit for the app stores.
Within this portal, select your desired package format – APK for Android or IPA for iOS – based on the platform you’re targeting.

Set Your Package ID/Bundle ID: This unique identifier is the digital fingerprint of your app. Make sure it’s distinctive and mirrors your app’s purpose and identity.
Define Your App Name: A name holds immense power – it’s the first impression you make. Choose a name that encapsulates your app’s essence and captures the attention of potential users.
Establish the Base URL: This is the digital heartbeat of your app, the starting point for all your app’s interactions. Make sure it’s accurate and aligned with your PWA’s core functionality.
But wait, there’s more! If you’re eager to add an extra layer of personalization, venture into the “All Settings” option. Here, a world of possibilities awaits – from tweaking versions and images to selecting a theme that resonates with your app’s identity.
Now you have the “Download Package” button visible to get the ultimate output of the package to be downloaded for use. You are done with the initial stage and you can install the packages into your device and test accordingly. You can have a detail how to do for Android Package and iOS Package from the tutorials provided by PWABuilder.
But hold on, your journey doesn’t end here. The road to successful publishing on the Google Play Store and Apple App Store involves more customizations. The polishing touch of meticulous refinement awaits – from perfecting app icons and splash screens to crafting engaging descriptions and preparing captivating visuals.
Step 3 (iOS): Navigating Challenges: Unveiling the Path to App Store Success
Even if you downloaded the source code from above step and try submitting the app in App Store, it’s very much likely to be rejected. Follow some quick things to make is publishable.
- Remove unnecessary and unsupported App Icons and add the appropriate icons. Do the same for Launch icon.
- Find out all the permission messages from plist file and replace that with meaningful ones as per your requirement. If your app support localisation, then localise the permission messages as well.
- If your app support Push Notification feature you will face issues though it’s supposed to be supported from iOS version 15.4. Probable reason is the app can not register the device id to the server for the notification. To fix this you must use user interaction like button/switch and open the user permission. iOS allows users to get push only if user accept the permission when it’s asked. You might try to use any timer to show the permission dialogue, but high chance is Apple will understand it and reject the app. To avoid rejection, use button to open the notification permission dialogue.

- Apple Sign-In is must if your app has any other social login integrated like Google, Facebook etc. But unfortunately Apple sign-in might not work properly when user download app from App Store. It only work when you install PWA app from browser. But don’t worry apple won’t reject your application for this.
- If your app has any feature like opening a specific page other then home when a link is clicked from outside the application then you will also face issue in PWA installed from App Store. It won’t be able to open the specific page other than Home. But in browser it will work properly.
- If your application is built for any specific localised language, then use all the permission texts in that language other than English.
- Make sure your app binary or metadata doesn’t include any dummy text like “lorem ipsum”.
- Make sure your app binary or metada doesn’t include any texts like “coming soon” which means an unimplemented feature.
Step 3 (Android): Navigating Challenges: Unveiling the Path to Google Play Success
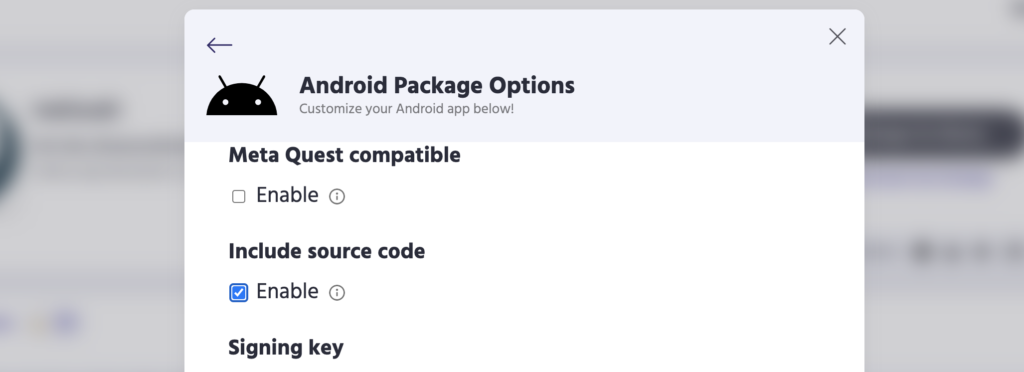
- If you want to do customisation, better to do before creating the apk. If you want to do more customisation better to download the source code. To download source code along with package mark the “Include source code” checkbox while downloading the package from PWABuilder.co
- Make sure you have uploaded the Digital Asset file(assetlinks.json) into your server which needs to be publicly accessible. Here is an example- https://webboard.app/.well-known/assetlinks.json
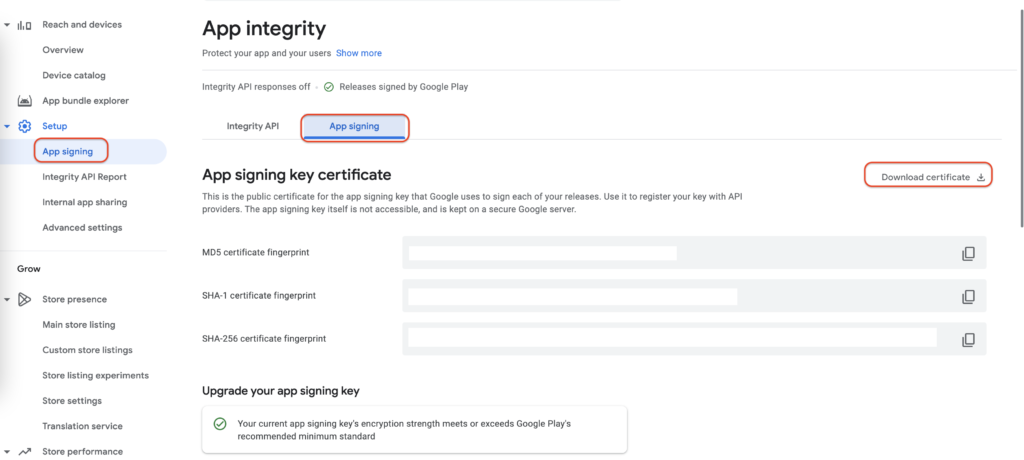
- Download the SHA-256 certificate fingerprint from your Google Play Console and use it in the assetlinks file.
The Foundation is Laid: Your App is Ready for Store Debut
Congratulations, trailblazer! You’ve traversed the landscape of app transformation, customization, and challenge anticipation with unwavering determination. As the final brushstrokes are added to your masterpiece, the moment is ripe to take a step back and admire the groundwork you’ve meticulously laid.
You’ve successfully navigated through the fundamental stages that equip your app for its grand entry into the Google Play Store and Apple App Store. From crafting the native package to aligning critical details and anticipating potential roadblocks, you’ve steered your app with finesse.

Just saved us from loosing the final payment from client. We were in big trouble publishing PWA in App Store. This blog helps us a lot finding the problem and to solve it.
Thank you for your valuable comment Mr. Rahman. We are happy to hear that it helped you.